Getting started
The Unofficial *NIX Lancher for Minecraft is an unofficial launcher for the Android version the Minecraft Bedrock Edition. It uses uses fake JNI (Java Native Interface) to communicate with Minecraft. Unofficial *NIX Lancher for Minecraft supports x86, x86_64, armhf, and arm64 versions of Minecraft on both Linux and MacOS.
Contribute Translations
You can now contribute translations of the Launcher UI via weblate at hosted.weblate.org/projects/minecraft-linux/mcpelauncher-ui-qt/ without touching the raw translation files.
Installation
Linux
The Unofficial *NIX Launcher for Minecraft can be installed in many ways, however the primary method of installation is with the Appimage.
AppImage
AppImages are deprecated and keep on an outdated release.
Some soft forks continued to violating the "Can I play with an apk" policy.
Consider switching to flatpak / native OS packages for Debian, Ubuntu or Fedora.
Minecraft Versions up to 1.21.60.10 are allowed, while only up to 1.21.5X are fully supported.
Prebuilt linux AppImages were available on
AppImage Builder on Github
After downloading simply open terminal,
chmod +x Minecraft_Bedrock_Launcher-*.AppImage and run
it. With some Filemanagers you should be able to run it with double
click, similar to running a *.exe file on Windows. Otherwise run it
from a Terminal ./Minecraft_Bedrock_Launcher-*.AppImage
Updating
To Upgrade, simply remove the old appimage and download the new version using the above steps.
Startmenu Integration
If it's your first time you have installed an AppImage and you want an Icon in your startmenu
- install AppImageLauncher
- run the AppImage like before
- AppImageLauncher will ask you to integrate it, press yes
- You can now start and update the Launcher directly from your startmenu
Flatpak
You can also install mcpelauncher on Linux via Flathub. To install it, first setup Flatpak then run
Install / Update System Wide
sudo flatpak install flathub io.mrarm.mcpelauncher
To update the launcher if already installed you can run this command
sudo flatpak update
Install / Update User
flatpak install --user flathub io.mrarm.mcpelauncher
To update the launcher if already installed you can run this command
flatpak update
Run
If it's your first time you have installed a Flatpak please logout from your Computer and sign back in to be able to find the Launcher inside your startmenu.
To run it from a Terminal, run
flatpak run io.mrarm.mcpelauncher
If it doesn't start you can enable debug logging like this
flatpak run io.mrarm.mcpelauncher -v
If this still just closes, you might need to disable wayland support due to bugs of certain linux (sub)systems like chromeos
flatpak run --nosocket=wayland --nosocket=fallback-x11 --socket=x11 io.mrarm.mcpelauncher
Debian, Ubuntu and Fedora repo
How to add the apt or rpm repository.
Once added you can install the mcpelauncher-manifest,
mcpelauncher-ui-manifest and msa-manifest packages to install the
launcher system wide.
Debian / Ubuntu
sudo apt update
sudo apt install mcpelauncher-manifest mcpelauncher-ui-manifest msa-manifest
Fedora
sudo dnf install mcpelauncher-manifest mcpelauncher-ui-manifest msa-manifest
Arch User Repository (AUR) Package
This is equivalent to a source build, but automated
Unofficial packages for Arch Linux users can be installed on the AUR, both client and Qt launcher. You can install using an appropriate AUR helper such as yay.
yay -S mcpelauncher-linux mcpelauncher-ui
If you find mcpelauncher-linux to be behind, there is https://aur.archlinux.org/packages/mcpelauncher-linux-git as well that is equivalent to a nightly build.
Run
You can find it in the startmenu or run the following command
mcpelauncher-ui-qt
If it doesn't start you can enable debug logging like this
mcpelauncher-ui-qt -v
macOS
Mojang will soon require OpenGL ES 3.1.
Starting with April 2025 updates to Minecraft can stop in this macOS Port, which supports at most OpenGL ES 3.0.
It's not recommend to buy the android game just for this launcher. Ownership on the Google Play Store, not any other Store, is a hard requirement for playing the full version of the game.
Minecraft Versions up to 1.21.71 are currently fully supported, 1.21.80.22 (beta) is working.
Prebuilt macOS binary's are currently available here. Always copy the App to a writeable location otherwise the updater won't work.
Source build
If there are no packages available for your distribution or you want to compile, check out the Source Build guide.
Frequently Asked Questions
Cannot host or join LAN/Friends worlds
Open UDP port 7551 in your firewall.
ufw
sudo ufw allow 7551/udp
sudo ufw reload
firewalld
sudo firewall-cmd --zone=public --add-port=7551/udp --permanent
sudo firewall-cmd --reload
Do I need to own Minecraft: Pocket Edition to play?
Yes. To download and update a compatible version of the game, the Google Play account you sign in with needs to own the game on the Play Store. Then you are able to download and play the latest version and even a few previous versions as well, although not officially supported by Google Play.
The launcher cannot download the game from:
- The Amazon App store, although may or may not work on ARM devices. You have to extract the APK from an Amazon device.
The launcher cannot download and cannot launch the game from:
-
The Apple iOS App store
-
The Microsoft Store, previously by redeeming a gift code for Minecraft: Windows 10 Edition
Even if this was possible, it would require a completely different Launcher.
Can I play with an APK?
No, this would allow piracy which is forbidden in this project.
Any attempt to document workarounds or to make it easy to import a paid APK without a valid Google Play game license is undesirable.
Game licenses can be revoked at any point of time by you, Microsoft/Mojang or Google, as it happened to all residents of Russia.
Ignoring this policy may cause suspension including termination of this project like it happended between 2022 - 2023.
Exception to the rule are Minecraft Trial and Edu where the latter doesn't work at this time.
Does it work on Windows 7 / 8?
No, due to the amount of work required to get this running on older versions of Windows. Play the Windows 10 Edition instead if you can. Note that you can not play Minecraft in the current version of the Windows Subsystem for Linux(WSL), as the mouse input is broken due to an issue with its graphic stack.
How does it work?
The project runs the native libraries from the Android version directly on your computer. This is accomplished by fixing the incompatibilities between the libc used on Android and the one used on desktop Linux or OS X (Android - Bionic; Linux - glibc). This is a simple compatibility layer which doesn't impact performance in any significant way; it's similar to Wine, but much more lightweight and simple. Additionally, all Android-specific code has been rewritten to run on Linux (AppPlatform, Store, Xbox Live, etc.).
Where are my worlds?
Linux: ~/.local/share/mcpelauncher/games/com.mojang/minecraftWorlds
Linux (Flatpak):
~/.var/app/io.mrarm.mcpelauncher/data/mcpelauncher/games/com.mojang/minecraftWorlds
Mac OS X:
~/Library/Application Support/mcpelauncher/games/com.mojang/minecraftWorlds
Each world has its own directory. If you have multiple worlds, you can
identify them by their name in levelname.txt found in each world folder.
The mcpelauncher-server creates and expects its world files in world.
Can I use resource packs?
Of course, put them into:
~/.local/share/mcpelauncher/games/com.mojang/resource_packs.
(For Flatpak)
~/.var/app/io.mrarm.mcpelauncher/data/mcpelauncher/games/com.mojang/resource_packs
For Mac OS X, put them into:
~/Library/Application Support/mcpelauncher/games/com.mojang/resource_packs.
Shaders are also resource packs. (Shaders must be GLSL based and must be compatible with your graphics drivers)
Note: You will probably need to extract .zip and .mcpack files
into their own subdirectory for them to work properly.
Can I re-enable the native fmod mode?
Yes for Minecraft 1.21.2x and below by extracting the lib/native folder of https://github.com/minecraft-linux/mcpelauncher-linux-bin/tree/1e84fde7d5fb90b913c84b9945700ef6af69df12 or https://github.com/minecraft-linux/mcpelauncher-mac-bin/tree/5189766d94de83a9fa6ea4f8477b1a5faca05bdb directly under Data Root/lib/native
Where is the Data Root folder?
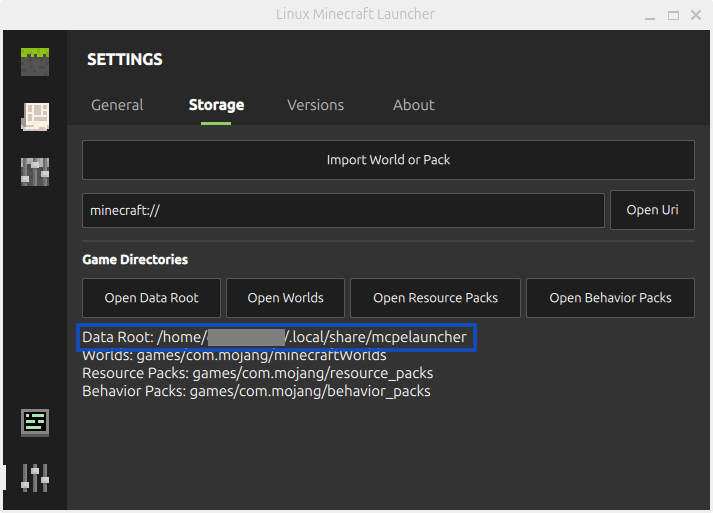
An incomplete list of known values, if your launcher profile has no custom path.
| Package Type | Path |
|---|---|
| linux | ~/.local/share/mcpelauncher |
| linux (flatpak) | ~/.var/app/io.mrarm.mcpelauncher |
| macOS | ~/Library/Application Support/mcpelauncher |
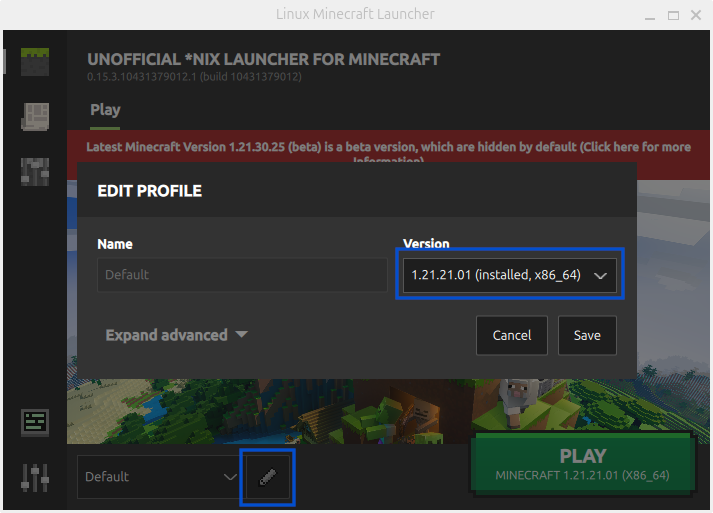
Can I play multiple versions of the game?
Yes, by editing your profile and changing the version in the dropdown menu.
Troubleshooting
Extracting APKs
I downloaded a Minecraft APK from the internet and it doesnt work!
APKs acquired from anything other than the Google Play store is unsupported by us. It might be possible, but we will not help you.
I copied the Minecraft APK from my phone over to my computer, but it doesnt extract
Your APK is made for the ARM architecture. You need an x86 (32-bit) or x86_64 (64-bit) APK to play on your computer. If you have an ARM laptop (most chromebooks, pinebook) it should work.
Can somebody give me the APK / extracted files?
NO. That is Piracy and we DO NOT support it on this project. Anyone caught asking this in the support server will face consequences.
AppImage
AppImage UI to large
Scaling of qt5 in our AppImages is broken on some pc's. Here a workaround
QT_SCALE_FACTOR=1 QT_AUTO_SCREEN_SCALE_FACTOR=0 ./MC.AppImage
Make shure to replace ./MC.AppImage with the actual path to your
AppImage file. On most systems you can drag'n drop the AppImage from
your file manager into the Terminal window to enter the full path.
Source: https://github.com/ChristopherHX/mcpelauncher-ui-manifest/issues/9
Controller
The player's view drifts by itself when a controller is plugged in
This happens when the controller's Deadzones are not set properly for the game. You must manually set the deadzones for your controller.
- Linux:
https://wiki.archlinux.org/index.php/Gamepad#evdev_API_deadzones or
if you have an Xbox360 Controller, open a terminal and run
sudo xboxdrv --detach-kernel-driver --deadzone 6000 --silent --type xbox360 --mimic-xpadwhile you are ingame. - Mac OS X: TBA
The controller doesn't work at all or you want to remap your gamepad buttons, analogsticks, dpad and triggers?
You need to create a gamepadmapping for your unknown gamepad.
- Download https://generalarcade.com/gamepadtool/
- create a mapping with it
- copy the new mapping line into
- AppImage:
~/.local/share/mcpelauncher/gamecontrollerdb.txt - Flatpak:
~/.var/app/io.mrarm.mcpelauncher/data/mcpelauncher/gamecontrollerdb.txt - macOS:
~/Library/Application Support/mcpelauncher/gamecontrollerdb.txt - you have to create this text file, if it doesn't exist
- reopen the game
The launcher can detect this situation, but it has been disabled to notify the user, because peoples mice, keyboards etc. were detected as gamepads, how broken some linux systems are is a mystery.
Your gamepad driver might be incompatible, then you need a sane controller.
Under Linux, you may have to plug the controller after launching the game.
Mouse cursor unlocks from game when using controller
You can try
- Disable Mouse Emulation for Gamepad
- Configure the Input Filter
Game launcher
Graphics performance issues (software rendering) - EGLUT: failed to initialize EGL display...
If the game is running poorly, it might be using software rendering
(identified by the llvmpipe string in the renderer). If you have been
redirected here by a link in the launcher this is the case.
You should make sure to install the proper 32-bit graphic drivers for your hardware.
- For integrated graphics and most AMD GPUs (and maybe Nvidia on
nouveau) -
sudo apt-get install libegl1-mesa:i386 libegl1-mesa-drivers:i386 - For some Nvidia cards (eg. GeForce series), assuming proprietary
driver is already installed, install the associated libnvidia-gl-xxx
package (where xxx = driver version for your hardware). For example,
if the nvidia-driver-390 metapackage is installed, then
sudo apt-get install libnvidia-gl-390.
You may need to reinstall the proprietary drivers if you had installed them manually before.
Performance can also degrade by running under Xwayland. If you are on a Wayland session and experiencing software rendering or graphical issues, try switching to an X11 session or building with native Wayland support (see below). Note that the default game window system (EGLUT) only supports X11, so the game runs under XWayland unless built with SDL3 or GLFW.
Black screen with Mesa 23.1+
Try adding MESA_EXTENSION_OVERRIDE=-GL_EXT_instanced_arrays to
environment variables.
MSA daemon could not be found
Make sure you have properly installed the following packages:
msa-daemon msa-ui-qt If compiling from sources, make sure to install
the MSA component.
No audio / music
❗Please note that the in-game Music is downloaded separately as a free item in the Marketplace.❗
- Ubuntu: Make sure
libasound2:i386is installed. If it is, you may need to installlibpulse0:i386. - Arch: Make sure
lib32-libpulseandlib32-alsa-pluginsare installed on your system. - Other distros: Make sure to install alsa (asound) and/or pulseaudio depending on your system configuration.
- macOS: The macOS i386 launcher doesn't have a recent enough native libfmod.so file for Minecraft
- PipeWire:
- Ubuntu, Arch: Make sure
pipewire-alsais installed. - Gentoo: Make sure thepipewire-alsaUSE flag is set for thepipewirepackage. - Other distros: Make sure to install the PipeWire ALSA plugin depending on your system configuration.
- Ubuntu, Arch: Make sure
sdl3audio SDL_OpenAudioDeviceStream failed, audio will be unavailable: Audio subsystem is not initialized
Starting with release 1.0.0, this app uses sdl3 for audio on linux to no longer require to ship properitary components from fmod. Make sure you had installed the dependencies for sdl3 audio subsystem
Like alsa dev, pulseaudio dev or pipewire dev libraries.
E.g.
- Ubuntu: libpulse-dev
- Fedora: alsa-lib-devel pulseaudio-libs-devel
Updating the launcher
- Linux AppImage or macOS to update the launcher on newer versions of the launcher, press the gear icon and then check for updates
- Flatpak
sudo flatpak update
If your launcher is too old or you can't find these buttons, you may need manually download a newer AppImage (Linux) or MacOS binary.
MacOS X Catalina
Should be solved by Updating the Launcher
Google prevents login This browser or app may not be secure. Try using a different browser
Should be solved by Updating the Launcher
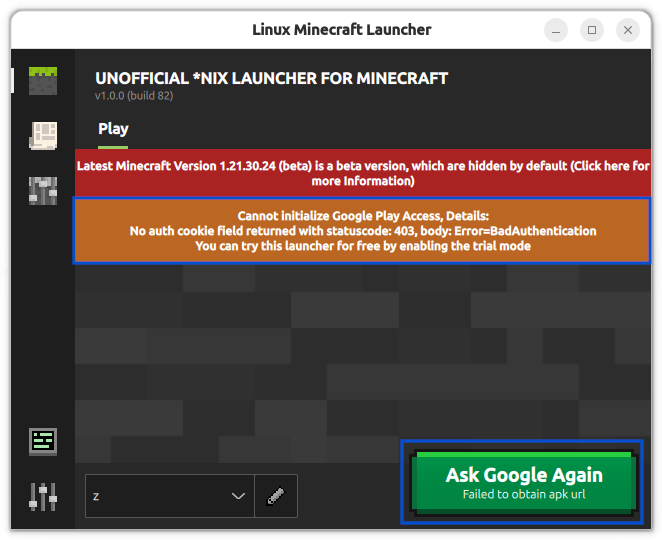
No auth cookie field returned
No auth cookie field returned with status: 400, body: MissingDroidGuard
Modify web activity tracking (either from off to on or from on to off, but do make changes) myactivity.google.com/activitycontrols again and try loggin in again, this is a temporary workaround. Once you have logged in this setting does not log you out until you are logged off.
File picking doesn't work or crashes
You need to install the zenity utility:
- Debian/Ubuntu -
sudo apt-get install zenity
I compiled and/or installed everything, but Minecraft doesn't start
Chances are, you don't have the actual game yet. This project does not provide MCPE/Minecraft Bedrock Edition itself.
The easiest way to download and start the game is through the graphical
Qt UI (mcpelauncher-ui-qt, sometimes called metalauncher). This
requires to log into a Google Play Account with Minecraft purchased.
Otherwise, obtain a valid Minecraft x86 .apk file and use the extract
utility
I used the Qt UI (metalauncher) to download the game, but mcpelauncher-client still doesn't work
To start a given version of Minecraft you can run mcpelauncher-client
with the -dg argument, eg.
mcpelauncher-client -dg ~/.local/share/mcpelauncher/versions/DESIRED_VERSION.
ls ~/.local/share/mcpelauncher/versions/ will list all versions you
have installed.
I run into lagspikes during gameplay
This can be fixed by starting the game manually via the command line. To do this, open a terminal and run the following:
Linux:
mcpelauncher-client -dg ~/.local/share/mcpelauncher/versions/1.2.3.4- Replace 1.2.3.4 with the version of Minecraft you want to run.
Mac OS X:
cd /Applications/Minecraft\ Bedrock\ Launcher.app/Contents/MacOS./mcpelauncher-client -dg ~/Library/Application\ Support/mcpelauncher/versions/1.2.3.4- Replace 1.2.3.4 with the version of Minecraft you want to run.
I am running into glitches with Xwayland
Xwayland does a fairly good job of running X applications on Wayland, but it is not perfect. Depending on your graphics drivers and your desktop environment/ window manager, you will run into issues that will affect your experience. These issues are beyond the scope of this project and should be reported upstream. There are two solutions: Fallback to an X11 session, or run the game natively under Wayland.
Note: If you are experiencing software rendering (llvmpipe) or other graphics performance issues under Wayland, switching to an X11 session is often the simplest fix. You can do this by selecting "X11" or "Xorg" from your display manager's session menu at the login screen.
Run natively under Wayland
By default, the binary uses EGLUT for the game window, which only supports X11
(running under XWayland on Wayland sessions). To get native Wayland support, you
will need to build the game launcher from source
with either -DGAMEWINDOW_SYSTEM=SDL3 or -DGAMEWINDOW_SYSTEM=GLFW.
Once you have the game launcher built with Wayland support, you will need to
force the client to run under Wayland, as it will still default to running
under Xwayland. This is done by unsetting the DISPLAY environment variable.
Through the Qt Launcher, edit your profile and open up the
advanced options. Under "Environment Variables", add a variable called
DISPLAY (case-matching), and leave the value blank. Doing so will have the
client running under native Wayland.
I cannot strafe sprint
Also known as diagnal Sprinting.
See also MCPE-170810.
| Affected CPU | Android Version | ChromeOS Version |
|---|---|---|
| Intel | Pressing A or D together with W stops sprinting | Works |
| AMD | Works | Works |
| arm64 | Works | Works |
Use the ChromeOS Version
- Buy the ChromeOS Version
- Discounted by the price of the Android Version
- You can use FydeOS installed into a VM to get access to the store
- Open Launcher Settings
- Enable ChromeOS checkbox
- Open Versions Tab
- Delete the installed android version
- Required for switching the version
- Now use the launcher as before
The mouse doesn't hide / behaves abnormally
WSL2
See https://github.com/microsoft/wslg/issues/376, this app targets linux booted by your Device not wsl. The summary of this issue is using gwsl instead of wslg.
ChromeOS
Make sure you have enabled #exo-pointer-lock in chrome://flags.
Qt launcher UI
Running the troubleshooter
Click the gear icon (settings) in the top right corner of the Qt launcher window, and press the [Run troubleshooter] button.
Could not find the game launcher
This may happen when the game launcher has not been installed or set
properly. The launcher (mcpelauncher-client) must be available in the
PATH variable for the launcher to work. If you are compiling from
sources and do not want to install the launcher, please set the
GAME_LAUNCHER_PATH at compile time with cmake (eg.
cmake -DGAME_LAUNCHER_PATH-/home/paul/mcpelauncher/build/mcpelauncher-client ..,
make sure that this is the path to the directory containing the binary,
and not the binary itself). Otherwise make sure the launcher is properly
installed in your system.
The launcher crashes when I press Download and Play
First of all, make sure a version name is displayed under the Download and Play button. If it's not, please wait some time and/or try restarting the launcher. A window asking you to accept Google Play TOS should appear first.
If the launcher still fails to download, it's possible you are trying to download a beta version of the game. Make sure to register in the beta first at https://play.google.com/apps/testing/com.mojang.minecraftpe.
You must have purchased Minecraft on the account you're trying to use.
In some cases, you may need to clear the launcher data clearing the launcher ui data.
Clearing the launcher UI data
Run the following commands:
rm -rf ~/.config/Minecraft\ Linux\ Launcher
rm -rf ~/.local/share/Minecraft\ Linux\ Launcher
rm -rf ~/.cache/Minecraft\ Linux\ Launcher
Obtaining the game log
In order to be able to view the game log, in the launcher press the gear in the top right corner and check the "Show log when starting the game" option. This will show a log and update it in realtime. You can copy it by pressing the icon in the top-right corner of the log window. Additionally, the log will be shown if the game crashes.
Starting Minecraft is blocked
- Please Open Settings
- Press Logout
- Press Login to restore Google Play Access
The launcher shows a blackscreen while the game runs in the background
Also known as "black screen of death", starting with Minecraft 1.18.30 (Renderdragon) this might be caused.
This section needs your help to get more entries, even if Solution is None
| OS | Hardware | Solution |
|---|---|---|
| macOS | GPU is firepro D300 2D | Pencil Icon -> Advanced Settings -> Select Metal |
| macOS | Intel HD 4000 | Both OpenGL and Metal working, SDL3 Metal crashs iff menubar is rendered |
| macOS | Apple M4 | Both OpenGL and Metal working, SDL3 Metal crashs |
| linux | * mesa3d | Fixed long time ago |
Google Login Error "Something went wrong"
Google accounts that needs a parent Account to approve the logon are a common case for this error
You might need this helper Application on an actual Android Phone/VM/Emulator
I can install Minecraft from Google Play on my phone just fine and I'm logged in with the same account in the launcher, but the launcher still refuses me to download the game
You might be using the wrong account. If you have multiple Google Accounts on you phone, and one or more of them have purchased the game, Google Play will show that you have already purchased the game (indicated by the Install button instead of showing the price) even if you used the wrong account in the Google Play account selector. You can find out which account really owns the game by looking at the purchase history of each account. Once you have found the correct account, you can go to settings, then logout and log in with the correct account.
on-screen keyboard and in-game typing interface both close after entering one letter on steam deck
You can work around this issue by doing one of two things. 1: When trying to edit text on a sign, hold STEAM while using the right trackpad until the game registers it as mouse input. Then, while using this method, look at the sign and press LT as you normally would. Now you should be able edit the sign's text freely. 2: When trying to type in chat, rename an item in an anvil, or write in a book and quill, you can instead/also use the steam deck's touchscreen. By pressing whichever field you want to type in, the action will be read as mouse input. Then, bring up the on-screen keyboard with STEAM + X, and you should be able to enter text as usual.
Note: using the touchscreen while not in a menu seemingly causes the camera to turn very quickly and unpredictably.
Configure the Input Filter
You can force your input device and override the behavior like this
- Press the pencil icon to edit your profile
- Press expand advanced
- Scroll down to Environment Variables and Click "Add new Variable"
- Enter Key
MCPELAUNCHER_CLIENT_FORCED_INPUT_MODEand value2(Gamepad Only) (0Touch Only,1Mouse + Keyboard Only) then press Save like this
The launcher would now refuse to recognize any mouse, keyboard, touch input events that your drivers seem to randomly send to the launcher this confuses the game so the launcher filters them and not all software devices work well with it.
If you don't like the input filter and think the game don't get confused you use this Key MCPELAUNCHER_CLIENT_RAW_INPUT with value 1
Building From Source
The qt5 version is deprecated and only supported on distributions with protobuf that not depends on abseil and uses cmake 3.x.
Use branch qt6 for cmake 4.0 and newer protobuf.
Prerequisites
Before building from source it is recommended to be familiar with the command line and basic c/c++ tooling. Building from source is unlikely to solve the majority of problems encountered when running the launcher
Table of Contents
Introduction (read first)
If you want to compile from sources make sure to install the basic prerequirements from below.
Basic Prerequisites
- Ubuntu -
sudo apt-get install git cmake pkg-config - Fedora -
sudo dnf install git make cmake pkg-config - Arch -
sudo pacman -S git make cmake pkgconf
What to build
- You will want to build MSA for Xbox Live support (for the client). Without it the game will not support signing in to Xbox Live.
- The game launcher to run the client.
- The Qt launcher UI if you want to easily download the .apk from Google Play and/or easily manage multiple Minecraft versions.
- The extract utility if you don't want to use the Qt launcher UI.
Updating
To update one of the components (so, msa, mcpelauncher or
mcpelauncher-ui), cd to it's directory and run:
git pull && git submodule update --recursive. Then follow the same
compile instructions as when doing a normal build, but skip the
git clone line. You'll still need to follow the install steps again
afterwards.
Uninstalling
If you installed using make install in order to uninstall do the
following as root (escalate using sudo su):
   rm /usr/local/bin/mcpelauncher-client
   rm /usr/local/bin/mcpelauncher-error
   rm /usr/local/bin/mcpelauncher-extract
   rm /usr/local/bin/mcpelauncher-ui-qt
   rm /usr/local/bin/mcpelauncher-webview
   rm /usr/local/bin/msa-daemon
   rm /usr/local/bin/msa-ui-qt
   rm /usr/local/share/applications/mcpelauncher-ui-qt.desktop
   rm /usr/local/share/pixmaps/mcpelauncher-ui-qt.png
   rm -r /usr/local/share/mcpelauncher/
Some of the commands may return errors - that's fine as some modules simply could have been not installed.
Compiling the game launcher
The qt5 version is deprecated and only supported on distributions with protobuf that not depends on abseil and uses cmake 3.x.
Use branch qt6 for cmake 4.0 and newer protobuf.
Prerequisites
- Ubuntu (Up to date as of 2025-02-15) - you'll need to install the
required packages:
sudo apt-get install --no-install-recommends g++ clang cmake make git ca-certificates libssl-dev libpng-dev libx11-dev libxi-dev libcurl4-openssl-dev libudev-dev libevdev-dev libegl1-mesa-dev libssl-dev libasound2 qtbase5-dev qtwebengine5-dev qtdeclarative5-dev libqt5svg5-dev qml-module-qtquick2 qml-module-qtquick-layouts qml-module-qtquick-controls qml-module-qtquick-controls2 qml-module-qtquick-window2 qml-module-qtquick-dialogs qml-module-qt-labs-settings qml-module-qt-labs-folderlistmodel qml-module-qtwebengine libpulse-dev - Fedora (Up to date as of 2024-08-21) - you'll need to install the
required packages:
sudo dnf install clang cmake make git ca-certificates libstdc++ glibc-devel libpng-devel zlib-devel libX11-devel libXi-devel libcurl-devel systemd-devel libevdev-devel mesa-libEGL-devel alsa-lib-devel pulseaudio-libs-devel mesa-dri-drivers systemd-devel libXtst-devel openssl-devel qt5-qtbase-devel qt5-qtwebengine-devel qt5-qtdeclarative-devel qt5-qtsvg-devel qt5-qtquickcontrols qt5-qtquickcontrols2 - Arch (Up to date as of 2024-12-02) - you'll need to install the
required packages:
sudo pacman -S gcc clang ca-certificates openssl libpng libx11 libxi gcc-libs glibc zlib curl systemd libevdev mesa alsa-lib pulseaudio libxtst qt5-base qt5-webengine qt5-declarative qt5-svg qt5-quickcontrols qt5-quickcontrols2 - macOS - you'll need to install the required packages:
brew install cmake libpng openssl@1.1 qt@5
Build instructions
git clone --recursive https://github.com/minecraft-linux/mcpelauncher-manifest.git mcpelauncher && cd mcpelauncher
mkdir -p build && cd build
CC=clang CXX=clang++ cmake .. -Wno-dev -DCMAKE_BUILD_TYPE=Release -DJNI_USE_JNIVM=ON
make -j$(getconf _NPROCESSORS_ONLN)
macOS: Add the following options to the cmake command:
-DOPENSSL_ROOT_DIR=$(brew --prefix openssl@1.1) -DCMAKE_PREFIX_PATH=$(brew --prefix qt@5).
Important note: Please note that you may need to replace
CC=clang CXX=clang++ cmake .. -Wno-dev -DCMAKE_BUILD_TYPE=Release -DJNI_USE_JNIVM=ON
with
CC=clang CXX=clang++ cmake .. -Wno-dev -DCMAKE_BUILD_TYPE=Release -DJNI_USE_JNIVM=ON -DMSA_DAEMON_PATH=/absolute/path/to/daemon/build/dir/msa-daemon
if you didn't install the MSA daemon (e.g. if you ran the previous
command in /home/paul/, you'd have to use
/home/paul/msa/build/msa-daemon as the path).
Adding Wayland support
By default, compiling the game launcher will not come with native Wayland support, as SDL3 is not enabled. The game will run under Xwayland, but if you are running into issues (e.g. flickering, mouse not locked), it's best to run the game natively through Wayland. To compile the launcher using SDL3, add the following cmake flag:
-DGAMEWINDOW_SYSTEM=SDL3
Installation
You can now optionally install the launcher system-wise. If you don't, you'll need to specify the path to the metalauncher later (and the resulting binary will only work on your system).
- Generic instructions - Run
sudo make install. Note that this doesn't make use of your system package manager, and therefore if possible, it's generally not recommended if there are better alternatives available for your system.
Compiling MSA (for Xbox Live)
Not used for Xbox live in Minecraft 1.16.40+
Prerequisites
- Ubuntu 18.04+ -
sudo apt-get install libssl-dev libcurl4-openssl-dev qtbase5-dev qtwebengine5-dev - Ubuntu 16.04 - You must add a Qt 5.9+ repository first
(
add-apt-repository ppa:beineri/opt-qt596-xenial && apt-get update) from which you should installapt-get install qt59base qt59webengine; also installapt-get install libssl-dev libcurl4-openssl-dev - Fedora (Up to date as of 2024-08-21) -
sudo dnf install openssl-devel libcurl-devel qt5-qtbase-devel qt5-qtwebengine-devel - Arch (Up to date as of 2024-12-02) -
sudo pacman -S openssl curl qt5-base qt5-webengine - macOS -
brew install cmake qt@5
Build instructions
git clone --recursive https://github.com/minecraft-linux/msa-manifest.git msa && cd msa
mkdir -p build && cd build
cmake -DENABLE_MSA_QT_UI=ON ..
make -j$(getconf _NPROCESSORS_ONLN)
macOS: replace the cmake line with
cmake -DCMAKE_PREFIX_PATH=$(brew --prefix qt@5) -DENABLE_MSA_QT_UI=ON ..
Installation
You can now optionally install the MSA daemon system-wise. If you don't, you'll need to specify the path to MSA later (and the resulting binary will only work on your system).
- Generic instructions - Run
sudo make install. Note that this doesn't make use of your system package manager, and therefore if possible, it's generally not recommended if there are better alternatives available for your system.
Important Note: Before continuing to the next step, make sure to go
to the parent directory with cd ../.. (make sure to return from the
build directory and then from the msa directory). This generally applies
to the following steps as well.
Compiling the Qt UI
The qt5 version is deprecated and only supported on distributions with protobuf that not depends on abseil and uses cmake 3.x.
Use branch qt6 for cmake 4.0 and newer protobuf.
Prerequisites
- Ubuntu 18.04+ -
sudo apt-get install libssl-dev libcurl4-openssl-dev libuv1-dev libzip-dev libprotobuf-dev protobuf-compiler qtbase5-dev qtwebengine5-dev qtdeclarative5-dev libqt5svg5-dev qml-module-qtquick2 qml-module-qtquick-layouts qml-module-qtquick-controls qml-module-qtquick-controls2 qml-module-qtquick-window2 qml-module-qtquick-dialogs qml-module-qt-labs-settings qml-module-qt-labs-folderlistmodel - Ubuntu 16.04 - You must add a Qt 5.9+ repository first
(
add-apt-repository ppa:beineri/opt-qt596-xenial && apt-get update, you probably have done this when compiling MSA already) from which you should installapt-get install qt59base qt59declarative qt59quickcontrols qt59quickcontrols2 qt59webengine; also installapt-get install libssl-dev libcurl4-openssl-dev libuv1-dev libzip-dev libprotobuf-dev protobuf-compiler - Fedora (Up to date as of 2024-08-21)-
sudo dnf install libuv-devel libzip-devel protobuf-devel protobuf-compiler qt5-qtbase-devel qt5-qtwebengine-devel qt5-qtdeclarative-devel qt5-qtsvg-devel qt5-qtquickcontrols qt5-qtquickcontrols2 libcurl-devel libXrandr-devel libXinerama-devel libXcursor-devel libXi-devel - Arch (Up to date as of 2024-12-02)-
sudo pacman -S openssl curl libuv libzip protobuf qt5-base qt5-webengine qt5-declarative qt5-svg qt5-quickcontrols qt5-quickcontrols2 qt5-tools libxrandr libxinerama libxcursor libxi - macOS -
brew install cmake qt@5 libzip libuv protobuf - The Game Launcher
Build instructions
git clone --recursive https://github.com/minecraft-linux/mcpelauncher-ui-manifest.git mcpelauncher-ui
cd mcpelauncher-ui && mkdir -p build && cd build
cmake ..
make -j$(getconf _NPROCESSORS_ONLN)
macOS: replace the cmake line with
cmake -DCMAKE_PREFIX_PATH=$(brew --prefix qt@5) ..
If you haven't installed the launcher system-wide, please replace
cmake .. with
cmake -DGAME_LAUNCHER_PATH=/absolute/path/to/mcpelauncher/build/dir/mcpelauncher-client ..
(if you compiled the mcpelauncher-manifest in /home/paul, then you'd
have to use
cmake -DGAME_LAUNCHER_PATH=/home/paul/mcpelauncher-manifest/build/mcpelauncher-client ..
as the command).
Installation
You can now optionally install the launcher system-wise.
- Generic instructions - Run
sudo make install. Note that this doesn't make use of your system package manager, and therefore if possible, it's generally not recommended if there are better alternatives available for your system.
Compiling the server launcher (DEPRECATED)
This instruction won't really work right now.
Prerequisites
- Ubuntu -
sudo apt-get install git cmake pkg-config - Fedora -
sudo dnf install git make cmake pkg-config gcc-c++ libstdc++.i686 glibc-devel.i686 - macOS -
brew install cmake
Requirements
- Ubuntu - you'll need to
sudo dpkg FV--add-architecture i386, then install the required packages:sudo apt-get install g++-multilib - macOS - none
Build instructions
git clone --recursive https://github.com/minecraft-linux/mcpelauncher-manifest.git -b master mcpelauncher && cd mcpelauncher
mkdir -p build && cd build
cmake -DBUILD_CLIENT=OFF ..
make -j$(getconf _NPROCESSORS_ONLN)
Extra
Extract utility
The extract utility is a simple utility for extracting the game from an .apk file.
The utility is not provided as a binary, because it is stand-alone and really straightforward to compile.
Usage
mcpelauncher-extract <source .apk> <destination dir>
The client binary can use any directory as the game directory, but
generally the preference is to use
~/.local/share/mcpelauncher/versions/1.2.3.4 as the directory for a
given version, as this allows you to easily multiversion the game. This
means, that if you have a file called mcpe.apk in the current working
directory and it is of the 1.5.3.0 version of Minecraft and would simply
like to extract it, you can do it as follows: |
mkdir -p ~/.local/share/mcpelauncher/versions/ && mcpelauncher extract mcpe.apk ~/.local/share/mcpelauncher/versions/1.5.3.0
To start a given version of Minecraft you can then run the
mcpelauncher-client with the -dg argument, eg.
mcpelauncher-client -dg ~/.local/share/mcpelauncher/versions/1.5.3.0
Build instructions
Prerequirements
- Ubuntu -
sudo apt-get install cmake libzip-dev - macOS -
brew install cmake libzip
Compiling
git clone https://github.com/minecraft-linux/mcpelauncher-extract.git -b ng
cd mcpelauncher-extract && mkdir -p build && cd build
cmake ..
make -j12
Dedicated server
Last updated to work with 1.12.0.28 and 1.12.1.1, other versions won't
work. If you want to use a specific Minecraft version you'll need to
start the mcpelauncher-server with the -dg argument, pointing to the
directory in which Minecraft was extracted using
the extract utility <extractor> or using the Qt UI launcher.
When using the Qt UI use the following command line option to select the game version (replace 1.2.3.4 with the version you want to use):
- On Linux:
-dg ~/.local/share/mcpelauncher/versions/1.2.3.4 - On MacOS:
-dg ~/Library/Application\ Support/versions/1.2.3.4
Server Properties
The dedicated server is configurable using a server.properties file with a syntax similar to the one used in the desktop Minecraft
The server automatically saves a default server.properties file the
first time it is started in the data directory (which is
~/.local/share/mcpelauncher/ by default; it can be overridden using
the -dd command line option).
Supported properties
level-dir(recommended to set) - name of the world in games/com.mojang/minecraftWorlds. An empty name will cause the world to be saved directly in the root worlds directory and can cause issues with saving.level-name- name of the worldlevel-generator- the world generator (0 - old, 1 - infinite, 2 - flat)level-seed- world seeddifficulty- difficulty level (default: 0 - peaceful)gamemode- default gamemode (default 0 - survial)force-gamemode- whether the gamemode should be enforced for existing players on join (default: false)motd- Message of the Day, displayed on the server list (has to be set for the server to be shown on the LAN world list, default: empty)server-port- port (default: 19132)server-port-v6- port for IPv6 connections (default: 19133)max-players- maximal player count on the server (default: 20)online-mode- specifies whether Xbox Live login is required to join the server (default: true)view-distance- maximal supported view distance (default: 22)player-idle-timeout- timeout in minutes after which players will be disconnected. Unlike the desktop edition, this value supports real numbers; (default: 0 - no timeout)
Example of a custom server.properties file
level-dir=world
level-name=My World
level-generator=1
level-seed=21389432043234
difficulty=0
gamemode=1
force-gamemode=false
motd=§eMy Minecraft server
server-port=19132
server-port-v6=19133
max-players=100
online-mode=false
view-distance=22
player-idle-timeout=0
Advanced
Debugging ndk libraries
Use this with gdb to load debugging symbols of android libraries into your session https://stackoverflow.com/a/33087762.
You get the load address with https://github.com/minecraft-linux/mcpelauncher-linker/blob/5127987ca49c4aeca6d180f26a9a4ac5aa4501c2/src/linker.cpp#L21. Minecraft's load address is printed to the log as a hex number.
codelldb
Works on linux, macOS and windows on both arm64 and intel
- Install vscode
- Install codelldb extension
- Compile the launcher with
-DCMAKE_BUILD_TYPE=Debug - Add the following property (only the python api seem to ignore that we load debug info of
.sofiles into a macOS / windows process)
mcpelauncher-linker exposes this function used as an automated breakpoint and calls it before calling the constructor of the game, the address is available in the cli output as well."preRunCommands": [ "breakpoint set --name mcpelauncher_linker_notifylldb -C \"script lldb.debugger.GetSelectedTarget().SetModuleLoadAddress(lldb.debugger.GetSelectedTarget().AddModule(lldb.process.ReadCStringFromMemory(lldb.frame.FindVariable('filename').unsigned, 255, lldb.SBError()), '', ''), lldb.frame.FindVariable('offset').unsigned)\" --auto-continue true", ] - Enjoy having step debugging in mods compiled with debug information and better stack traces of the minecraft game
Development Utilities
Use readelf to list symbols of libminecraftpe.so
readelf --wide -s libminecraftpe.so
Symbols with prefix java_ are callable java native interface
functions.
Use dextojar on classes.dex of the android apk +
https://java-decompiler.github.io/ on the jar file to get an idea how
mojang implemented the java functions.
Glcore patch
The Glcore patch is a patch to modifiy the android game to render on opengl 3.3 surfaces instead of opengl es 2, which is unavailable on macOS.
Due to absense of debugging symbols, is this patch unavailable on 1.17+ and macOS builds use a fallback via an opengl es2 emulation layer called angle. The goal of this section is to document how such a binary pattern has been created for 1.16.0.
To create such binary pattern to be able to find the required function without the debugging symbols, you might be able to use this ida pro plugin https://github.com/ajkhoury/SigMaker-x64.
For example here two patterns and the actual required function name of the game https://github.com/minecraft-linux/mcpelauncher-client/blob/eb2465a1f59422b1cf11d14b9838eeb5d5c32237/src/gl_core_patch.cpp#L22. This symbol can be found via readelf on 1.16.201.
Jni
Implement a new jni function
Add the following flags to the cmake command like
cmake -DJNIVM_ENABLE_TRACE=ON -DJNIVM_USE_FAKE_JNI_CODEGEN=ON, this
doesn't work if you have configured to use FakeJni ( JNI_USE_JNIVM=OFF
)
Edit this file https://github.com/minecraft-linux/mcpelauncher-client/blob/eb2465a1f59422b1cf11d14b9838eeb5d5c32237/src/jni/jni_support.cpp#L254 and add
vm.printStatistics();
- Running mcpelauncher-client now, will print almost every function call from the game to the fake java native interface.
- Closing the gamewindow now should log compileable stubs of the called functions without class inherence
- Put the class or method declaration into a new header file in https://github.com/minecraft-linux/mcpelauncher-client/blob/eb2465a1f59422b1cf11d14b9838eeb5d5c32237/src/jni.
- Put the stubs of the class / methods you want to implement into a new cpp file
- Put the class descriptor into https://github.com/minecraft-linux/mcpelauncher-client/blob/eb2465a1f59422b1cf11d14b9838eeb5d5c32237/src/jni/jni_descriptors.cpp
- Put
vm.registerClass<MyClass>()into https://github.com/minecraft-linux/mcpelauncher-client/blob/eb2465a1f59422b1cf11d14b9838eeb5d5c32237/src/jni/jni_support.cpp#L25
Access FakeJni::JString ----------------------- call
FakeJni::JString::asStdString() to get a std::string - create a new
jni string with std::make_shared<FakeJni::JString>("mycstr")
Register a native jni static function
To call native functions you have to register them first. Put
registerNatives(BrowserLaunchActivity::getDescriptor(), {
    {"somefunction", "(JLjava/lang/String;)V"},
}, symResolver);
BrowserLaunchActivityis the c++ class name of the jni class"(JLjava/lang/String;)V"is the jni descriptor of this native function describes the parameter and return value of the function, see the jdk jni documentation"somefunction"is the jni name of this function
Call a native jni instance function from an instance method
auto method = getClass().getMethod("(JLjava/lang/String;)V", "somefunction");
FakeJni::LocalFrame frame;
method->invoke(frame.getJniEnv(), this, callback, frame.getJniEnv().createLocalReference(std::make_shared<FakeJni::JString>("mystr")));
frame.getJniEnv().createLocalReference(std::make_shared<FakeJni::JString>("mystr"))creates a new jni reference for calling a native jni methodFakeJni::LocalFrame frame;reads the current attached fake jvm for this thread and creates a new jni reference frame, it's destructor releases all local references of this frame. Call the contructor with a vm object to create a frame on detached threads."(JLjava/lang/String;)V"is the jni descriptor of this native function describes the parameter and return value of the function, see the jdk jni documentation"somefunction"is the jni name of this function
Call a native jni static function from an instance method
auto method = getClass().getMethod("(JLjava/lang/String;)V", "somefunction");
FakeJni::LocalFrame frame;
method->invoke(frame.getJniEnv(), &getClass(), callback, frame.getJniEnv().createLocalReference(std::make_shared<FakeJni::JString>("mystr")));
frame.getJniEnv().createLocalReference(std::make_shared<FakeJni::JString>("mystr"))creates a new jni reference for calling a native jni methodFakeJni::LocalFrame frame;reads the current attached fake jvm for this thread and creates a new jni reference frame, it's destructor releases all local references of this frame. Call the contructor with a vm object to create a frame on detached threads."(JLjava/lang/String;)V"is the jni descriptor of this native function describes the parameter and return value of the function, see the jdk jni documentation"somefunction"is the jni name of this function
Call an arbitary native jni static function from an instance method
auto method = BrowserLaunchActivity::getDescriptor()->getMethod("(JLjava/lang/String;)V", "somefunction");
FakeJni::LocalFrame frame;
method->invoke(frame.getJniEnv(), BrowserLaunchActivity::getDescriptor().get(), callback, frame.getJniEnv().createLocalReference(std::make_shared<FakeJni::JString>("mystr")));
frame.getJniEnv().createLocalReference(std::make_shared<FakeJni::JString>("mystr"))creates a new jni reference for calling a native jni methodFakeJni::LocalFrame frame;reads the current attached fake jvm for this thread and creates a new jni reference frame, it's destructor releases all local references of this frame. Call the contructor with a vm object to create a frame on detached threads."(JLjava/lang/String;)V"is the jni descriptor of this native function describes the parameter and return value of the function, see the jdk jni documentation"somefunction"is the jni name of this function
Call an arbitary native jni static function from anywhere
// A reference to the jvm, you might have to manually pass them to your function or class
Baron::Jvm vm;
//...
FakeJni::LocalFrame frame(&vm);
auto method = BrowserLaunchActivity::getDescriptor()->getMethod("(JLjava/lang/String;)V", "somefunction");
method->invoke(frame.getJniEnv(), BrowserLaunchActivity::getDescriptor().get(), callback, frame.getJniEnv().createLocalReference(std::make_shared<FakeJni::JString>("mystr")));
frame.getJniEnv().createLocalReference(std::make_shared<FakeJni::JString>("mystr"))creates a new jni reference for calling a native jni methodFakeJni::LocalFrame frame;reads the current attached fake jvm for this thread and creates a new jni reference frame, it's destructor releases all local references of this frame. Call the contructor with a vm object to create a frame on detached threads."(JLjava/lang/String;)V"is the jni descriptor of this native function describes the parameter and return value of the function, see the jdk jni documentation"somefunction"is the jni name of this function
Create a global jni reference of a c++ object
// A reference to the jvm, you might have to manually pass them to your function or class
Baron::Jvm vm;
//...
auto activity = std::make_shared<MainActivity>();
auto activityRef = vm.createGlobalReference(activity);
Ndk Shims
How to add new or missing native ndk function
Adding a new libc function to the launcher
Our libc-shim wrapper are split across multiple cpp files, all have a structure like https://github.com/minecraft-linux/libc-shim/blob/master/src/common.cpp#L334-L350.
void shim::add_common_shimmed_symbols(std::vector<shim::shimmed_symbol> &list) {
    list.insert(list.end(), {
        {"__errno", bionic::get_errno},
    });
}
"__errno"is the name of the libc symbolbionic::get_errnois a function or global pointer with the same type and calling convention as the ndk provided function. Linux armhf has a different calling convention than android armeabi-v7a, you have to wrap all functions with floating point arguments or return values, useARMHFREWRITE(bionic::get_errno)to automatically wrap it in c++. Windows uses different calling conventions than linux, macOS and Android.
Loading a stub library with mcpelauncher-linker
Stub libraries are libraries without the need of an android shared
library file, which implements symbols of real shared libraries. You can
call linker::dlopen and linker::dlsym on them to get the pointer of
the function or global object.
std::unordered_map<std::string, void*> syms;
syms["__errno"] = (void*) bionic::get_errno;
linker::load_library("stub.so", syms);
"__errno"is the name of the symbolbionic::get_errnois a function or global pointer with the same type and calling convention as the ndk provided function. Linux armhf has a different calling convention than android armeabi-v7a, you have to wrap all functions with floating point arguments or return values, useARMHFREWRITE(bionic::get_errno)to automatically wrap it in c++. Windows uses different calling conventions than linux, macOS and Android.
MCPELauncher API Reference
This document provides an overview of the MCPELauncher API, detailing the available symbols, their signatures, and descriptions. The API is designed for advanced modding and hooking functionalities in Minecraft Pocket Edition.
Overview
Mods have to be compiled as android shared libraries (.so files) using the Android NDK and placed in the mods directory of the MCPELauncher. The launcher will automatically load these libraries at startup.
The MCPELauncher API allows developers to hook into Minecraft's runtime, modify behavior, and manage dynamic libraries. It provides functions for logging, hooking symbols, patching memory, and handling dynamic libraries.
Accessing the API
Use dlopen("libmcpelauncher_mod.so", RTLD_NOW) and dlsym to access the API. The symbols are defined in the libmcpelauncher_mod.so shared library.
Otherwise declare the symbols as weak, extern "C" in your C++ code to avoid name mangling and allow the launcher to provide the implementations.
extern "C" {
    __attribute__((weak)) void* mcpelauncher_hook(void* sym, void* hook, void** orig);
    __attribute__((weak)) void* mcpelauncher_hook2(void* lib, const char* sym, void* hook, void** orig);
    // ... other symbols
}
Logging Functions
| Symbol | Description | Notes |
|---|---|---|
mcpelauncher_log | Logs a message | Deprecated; use Android liblog |
mcpelauncher_vlog | Logs a verbose message | Deprecated; use Android liblog |
Hook Initialization
| Symbol | Signature | Description |
|---|---|---|
mcpelauncher_preinithook2 | void(const char* name, void* sym, void* user, void (*callback)(void*, void*)) | Registers a pre-init hook with a callback |
mcpelauncher_preinithook | void(const char* name, void* sym, void** orig) | Registers a pre-init hook and stores original symbol |
Hook Management
| Symbol | Signature | Description |
|---|---|---|
mcpelauncher_hook | void*(void* sym, void* hook, void** orig) | Creates and applies a hook for a symbol |
mcpelauncher_hook2 | void*(void* lib, const char* sym, void* hook, void** orig) | Creates a hook for a symbol in a specific library |
mcpelauncher_hook2_add_library | void(void* lib) | Adds a library to the hook manager |
mcpelauncher_hook2_remove_library | void(void* lib) | Removes a library from the hook manager |
mcpelauncher_hook2_delete | void(void* hook) | Deletes a hook instance |
mcpelauncher_hook2_apply | void() | Applies all registered hooks |
Memory Patching
| Symbol | Signature | Description |
|---|---|---|
mcpelauncher_patch | void*(void* address, void* data, size_t size) | Patches memory at a given address |
| (Apple ARM64 only) | Uses pthread_jit_write_protect_np and sys_icache_invalidate for JIT-safe patching |
Dynamic Library Handling
| Symbol | Description |
|---|---|
mcpelauncher_host_dlopen | Wrapper for dlopen |
mcpelauncher_host_dlsym | Wrapper for dlsym |
mcpelauncher_host_dlclose | Wrapper for dlclose |
mcpelauncher_dlclose_unlocked | Custom unlocked dlclose |
Symbol Relocation
| Symbol | Signature | Description |
|---|---|---|
mcpelauncher_relocate | void(void* handle, const char* name, void* hook) | Relocates a single symbol |
mcpelauncher_relocate2 | void(void* handle, size_t count, hook_entry* entries) | Relocates multiple symbols |
mcpelauncher_load_library | void(const char* name, size_t count, hook_entry* entries) | Loads a library and applies hooks |
mcpelauncher_unload_library | void(void* handle) | Unloads a previously loaded library |
Data Structures
struct hook_entry {
    const char* name;
    void* hook;
};
Used for batch relocation and library loading.
Game Window API Reference
This API provides access to the primary game window and allows registration of various input and lifecycle callbacks.
Core Window Access
| Symbol | Signature | Description |
|---|---|---|
game_window_get_primary_window | GameWindowHandle*() | Returns a pointer to the current primary game window |
| game_window_is_mouse_locked | bool(GameWindowHandle* handle) | Checks if the mouse is currently locked in the window |
| game_window_get_input_mode | int(GameWindowHandle* handle) | Retrieves the current input mode from the window callbacks |
Input Callback Registration
These functions allow you to register input event handlers for keyboard and mouse interactions.
| Symbol | Signature | Description |
|---|---|---|
game_window_add_keyboard_callback | void(GameWindowHandle* handle, void* user, bool (*callback)(void* user, int keyCode, int action)) | Registers a keyboard input callback |
game_window_add_mouse_button_callback | void(GameWindowHandle* handle, void* user, bool (*callback)(void* user, double x, double y, int button, int action)) | Registers a mouse button input callback |
game_window_add_mouse_position_callback | void(GameWindowHandle* handle, void* user, bool (*callback)(void* user, double x, double y, bool relative)) | Registers a mouse movement callback |
game_window_add_mouse_scroll_callback | void(GameWindowHandle* handle, void* user, bool (*callback)(void* user, double x, double y, double dx, double dy)) | Registers a mouse scroll callback |
Lifecycle & Rendering Callbacks
| Symbol | Signature | Description |
|---|---|---|
game_window_add_window_creation_callback | void(void* user, void (*onCreated)(void* user)) | Registers a callback to be invoked when the window is created |
game_window_add_swap_buffers_callback | void(void* user, void (*callback)(void* user, EGLDisplay display, EGLSurface surface)) | Registers a callback for when buffers are swapped during rendering |
Library Integration
Use dlopen and dlsym to load the library and access the functions
dlopen("libmcpelauncher_gamewindow.so");
Data Types
GameWindowHandle
An opaque structure representing the game window.
Menu API Reference
Integrate custom menus below the mods menu item and create custom windows with interactive controls using the libmcpelauncher_menu.so library.
MenuEntryABI Structure
Defines a single menu entry with potential subentries.
struct MenuEntryABI {
    const char* name;                    // Name shown in the UI
    void* user;                          // Custom user data passed to callbacks
    bool (*selected)(void* user);       // Selection callback
    void (*click)(void* user);          // Click callback
    size_t length;                      // Number of subentries
    MenuEntryABI* subentries;           // Pointer to array of subentries
};
void mcpelauncher_addmenu(size_t length, MenuEntryABI* entries);
Adds a group of menu entries to the launcher.
length: Number of items inentriesentries: Pointer to array ofMenuEntryABI
control Structure
Represents a UI control embedded in a window.
struct control {
    int type; // Enum-like control type
    union {
        struct {
            const char* label;
            void* user;
            void (*onClick)(void* user);
        } button;

        struct {
            const char* label;
            int min;
            int def;
            int max;
            void* user;
            void (*onChange)(void* user, int value);
        } sliderint;

        struct {
            const char* label;
            float min;
            float def;
            float max;
            void* user;
            void (*onChange)(void* user, float value);
        } sliderfloat;

        struct {
            const char* label;
            int size; // 0 = normal, 1 = small title
        } text;

        struct {
            const char* label;
            const char* def;
            const char* placeholder;
            void* user;
            void (*onChange)(void* user, const char* value);
        } textinput;
    } data;
};
Control Types
Set type to match the control structure being used:
0: Button1: Slider (integer)2: Slider (float)3: Static text4: Text input
void mcpelauncher_show_window(...)
Displays a window populated with interactive controls.
void mcpelauncher_show_window(
    const char* title,
    int isModal,
    void* user,
    void (*onClose)(void* user),
    int count,
    control* controls
);
Parameters
title: Title displayed on the windowisModal: Modal flag (non-zero blocks other inputs)user: Custom user data passed to callbacksonClose: Callback called when window closescount: Number of controlscontrols: Pointer to array ofcontrolstructs
void mcpelauncher_close_window(const char* title);
Closes the window with the specified title.
External Links
Discord
We have a Discord chatroom, which you can join using the following link: https://discord.gg/TaUNBXr
GitHub Repository
All of the source code for the project can be found on our GitHub:
Main Repository: https://github.com/minecraft-linux/mcpelauncher-manifest
Github Group: https://github.com/minecraft-linux